|
|
|
Kto jest w sklepie?
Sklep przegląda 6043 gości |
|
Kategorie
|
|
Informacje
|
|
Polecamy
|
|
|
 |
|
|
Dla tego produktu nie napisano jeszcze recenzji!
 ;
Wszystko w porządku.
Instrukcja czytelna i kompletna.
Dziękuję.
all right!
thank you.
;
Bardzo dobra instrukcja. Zawiera wszystko co potrzeba, polecam!
 ;
Instrukcja jest OK. Schematy czytelne, opisane niektóre procedury.
;
Instrukcja bardzo czytelna. zawiera co potrzeba. Polecam
;
...instrukcja serwisowa w pełni czytelna i kompletna. Dziękuję!
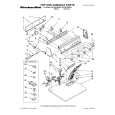
UX-L46V/UX-L36V
Removing the Main board/ the Heat sink board (See Fig.11~13)
Remove the metal cover, the rear cover and the rear panel. 1. Disconnect the card wire from connector CN902, CN903, CN904 and CN905 on the main board and remove the CD-R/RW mechanism assembly. REFERENCE: Refer to the method of removing the CD-R/RW mechanism assembly and Fig.8. 2. Disconnect the vocal board from connector CN920 on the main board. REFERENCE: The vocal board can be detached without removing the main board. 3. Remove the two screws I attaching the main board. 4. Disconnect the card wire from connector CN931, CN935, CN933, CN934, CN913, CN901, CN900 and CN917 on the main board. 5. Remove the band f and disconnect the card wire from connector CN951 on the power transformer assembly. Remove the main board / the heat sink board from the body. 6. Release the joint e of the main board and disconnect connector CN944 and CN945 of the heat sink board from connector CN915 and CN916 of the main board respectively. 7. Remove the two screws J attaching the heat sink bracket and heat sink board. Fig.12
Main board Heat sink CN915 CN916 Main board Optical digital board CN905 CD-R/RW mechanism assembly
CN902 CN904 CN903
e
I
I
Fig.11
Main board CN920
Vocal board
Main board Heat sink
CN933
CN931 CN935
J
CN934 CN900 CN913
CN917 CN901
f
CN951 Power transformer assembly
CN945 CN944
Heat sink board
Fig.14
Fig.13
1-8
|
|
|
> |
|