Gruba instrukcja - poprostu wszystko co potrzreba - polecam .
Tekstowy podgląd strony 7 (kliknij aby zobaczyć)
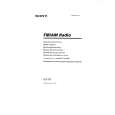
Installation and connection
Mounting the Base to the Ceiling
Safety cable Pipe Seal tape 12mm(15/32") or less
completed. Removing the sheet during installation may result in scratching of the dome cover.
a sturdy location (ceiling slab or channel) and safety cable. CAUTION � For the used safety cable, pay particular caution to the length, strength, pull, material (insulation), etc. � Always use the screws (M4 X 8mm) mounted on the unit.
1.
Dome cover
Wrench
1.
Remove the dome cover from the base Loosen the Tamper-resistant screws fixing the dome cover (3 locations) by using the provided wrench and turning counterclockwise. Remove the camera unit from the base Loosen the screws on the camera unit in the order of and and remove the camera unit from the base.
6. 7.
Not Supplied
Base
2.
5.
2.
Camera unit
Wrap seal tape Wrap the screw section of the pipe with at least 2 rolls of seal tape. Wrap the seal tape where the pipe-hole screws and pipe screws meet. Mount the base to the pipe Screw in the base to the pipe by turning it clockwise. (Conduit hole: 19.1mm (3/4")) When the Dome camera cannot be installed to the Ceiling ( page 16) When installing the Dome camera to the electrical box ( page 17) Fix the base to the ceiling Securely tighten using screws suitable for the mounting holes (ø4.4mm(11/64")). CAUTION
MEMO Dome cover and camera unit are connected by the safety cable and base.
6.
3.
Insert the included Silica gel Insert the provided silica gel in the Base interior and hold using the lug plate.
7.
3.
Lug plate
MEMO � Always replace the silica gel when reconnecting/resetting during repair or maintenance. When replacing, use: JVC parts No. LW40500-001A CAUTION
Check to make sure there is no gap between the ceiling and base. CAUTION � Since the camera unit and dome cover will be in a suspended state from the base by the safety cable, the camera unit and dome cover will also move when mounting the base to the pipe. Facing the camera lens to the dome-cover side at this time may cause scratching of the lens. Make sure the dome cover and camera unit are facing opposite sides. � When screwing in the pipe into the conduit hole, do not screw in more than 12mm(15/32") to prevent damage to the pipe interior.
Silica gel
� When performing installation under raining conditions, take caution as not to allow rain to enter inside the unit. � Always use the provided silica gel. When not using the silica gel, the dome cover of the camera lens may cloud as a result.
E-10
E-11
English
Remove the camera unit from the base and mount the base to the pipe. � Do not remove the protective sheet affixed to the dome cover until installation work is
4.
5.
4.
Connecting the safety cable To prevent dropping, connect the unit to