|
|
|
Kto jest w sklepie?
Sklep przegląda 5847 gości |
|
Kategorie
|
|
Informacje
|
|
Polecamy
|
|
|
 |
|
|
Dla tego produktu nie napisano jeszcze recenzji!
EN
39
8 Set tape speed
speed.
Press HS/STD/LS3/SP/LP (
) to set the tape
� Even if a power failure occurs, the VCR keeps your timer
NOTES:
9 Return to normal screen
�PROGRAM COMPLETED� appears on the screen for about 5 seconds, then normal screen appears. Press TIMER. The VCR turns off automatically and ��� is
Press PROG. or OK.
programs. However, the clock time, channel settings, and other menu settings are lost if it lasts for more than 3 minutes. As a result, when the power is supplied again to this VCR after the power failure, the following will take place. 1. This VCR starts the Plug & Play setting automatically to restore the clock time and channel setting. 2. If the clock time and channel setting are restored correctly, each timer program you have made will start at its start time unless its end time has elapsed. Programs that start after midnight must have the next day�s date. After timer recording is completed, the VCR turns off automatically. You can program the timer recording while a regular recording is in progress; the menu screens will not be recorded. If the tape reaches its end during timer recording, the cassette is automatically ejected. To timer-record cable or satellite channels, be sure to keep the cable box or DBS receiver turned on.
0 Engage timer recording standby mode
displayed on the front display panel.
� � � � �
To timer-record daily (Monday�Friday) or weekly serials
Press DAILY (M-F) (number �8�) or WEEKLY (number �9�) anytime during steps 3 through 8. �DAILY� or �WEEKLY� appears on the Program screen. � Pressing the button again makes the corresponding indication disappear.
To use the VCR while it is in timer recording standby mode
Press TIMER to cancel the timer recording standby mode, then press POWER to turn on the VCR. DO NOT forget to put the VCR into timer recording standby mode again by pressing TIMER after you use the VCR; otherwise, you cannot record the broadcast you want. � When �AUTO TIMER� ( pg. 52) is set to �ON�, the timer recording standby mode is automatically engaged when the VCR is turned off. It is temporarily canceled when the VCR is turned on. You do not have to press TIMER to engage or disengage the timer recording standby mode.
ATTENTION FOR DBS RECEIVER USERS
If you are using a DBS receiver (unless �DBS RECEIVER SET UP� is set to �OFF� pg. 19), the band indication (TV, CATV or DBS) appears under the
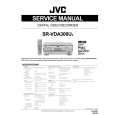
PROGRAM START STOP DATE 8:00PM 10:00PM 12/24/03 CH DBS 110 STD (SP) WED PRESS (+/�, SP/EP, 8=DAILY 9=WEEKLY) THEN (OK) PRESS (PROG.) TO END
channel number indication. TV :To timer-record a regular TV broadcast received on the VCR. CATV :To timer-record a cable TV broadcast received on the VCR, or through a cable box (unless �CABLE BOX SET UP� is set to �OFF� pg. 16). DBS :To timer-record a satellite broadcast received through a DBS receiver.
NOTE:
If �BAND� is set to �TV� on the Tuner Set Up Screen ( pg. 14) and �CABLE BOX SET UP� is set to �OFF� on the Cable Box Set screen ( pg. 16), �CATV� will not be displayed on the Program screen; If �BAND� is set to �CATV� or �CABLE BOX SET UP� is set to �ON�, �TV� will not be displayed.
If the channel number entered requires that the band be set, �7=DBS� is displayed on the screen. If this happens, press the Number key �7 (DBS)� to select �DBS�.
|
|
|
> |
|