Nie masz w koszyku żadnych produktów
 
English Polski Spanish 
Szukaj instrukcji do
 

(e.g. AA-V20EG JVC, ZX-7 Sony )
PayPal 1000+ rating Secure, Encrypted Checkout.
 
Kto jest w sklepie?
Sklep przegląda 5858 gości 
Kategorie
Informacje
Polecamy
Strona główna >> JVC >> KSAX4700 Instrukcja Serwisowa
 
 0 szt. w koszyku 

JVC KSAX4700
Instrukcja Serwisowa


Tweetnij o tym produkcie a dostaniesz $1.00 rabatu!
  • Zawiera schematy
  • Plik do pobrania
  • Format PDF
  • Kompletna instrukcja
  • Język: English
Cena: $4.99

Opis JVC KSAX4700 Instrukcja Serwisowa

Kompletna instrukcja serwisowa w formie pliku PDF. Instrukcje serwisowe zazwyczaj zawierają schematy, diagramy drukowanych obwodów (PCB), schematy połączeń, schematy blokowe oraz katalog części. Instrukcje serwisowe są wykorzystywane glównie przez osoby naprawiające uszkodzony sprzęt.

Jeśli chcesz się dowiedzieć jak się obsługuje Twój telewizor, magnetowid, odtwarzacz mp3 itp. powinieneś raczej szukać instrukcji obsługi

Instrukcja jest dostępna w następujących językach:

Plik nie jest jeszcze gotowy
Musisz najpierw dokonać zakupu.

Recenzje produktu
Dla tego produktu nie napisano jeszcze recenzji!
Recenzje innych produktów
 ST-8077K TECHNICS Instrukcja Serwisowa by Adam Grążka;
...instruction is ok. ...instrukcja jest ok. Thanks/Dzięki
 T5 SANSUI Instrukcja Serwisowa by Adam Grążka;
Documentation made ​​available quickly and It is good quality. Thanks.

Tekstowy podgląd strony 5 (kliknij aby zobaczyć)
KS-AX4700

Removal of main parts
CAUTION: If electricity is connected during disassembly, it must be a no load current. If it is load current, be sure to attach a heat sink to the power-amp IC. This will be damaged if the above precautions are not followed, as it does not have a sub heat sink attached to it.

B

Bottom cover

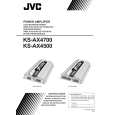
Removing the bottom cover (see Fig. 1)
1. From the bottom side of the main unit, remove the 4 screws A retaining the bottom cover. 2. Then remove the 6 screws B retaining the bottom cover. 3. Remove the bottom cover.

A

A

B
Fig. 1

Top panel

Removing the MAIN PCB (see Fig. 2 to 8)
1. Remove the bottom cover from the main unit. 2. Loosen and remove the 2 screws C retaining the top plate on the main unit. (Stoppers are attached to the backs of the C screws so that they cannot be removed easily.)

C

C

Fig. 2

3. Remove the 6 volume knobs on top of the control panel. If it cannot be pulled out easily, insert a rope or wire between the base of the volume knob and the control panel so that the volume knob is raised a little above the surface and then remove it. (Be careful when inserting a lever etc. not to scratch the surface of the control panel). 4. Remove the 4 screws D retaining the control panel. Then detach the control panel and the switch knobs.

Volume knob

D
Switch knob Control panel

D
Fig. 3

Volume knob

Rope or wire Control panel

(Side view)

Fig. 4

1-5

Klienci kupując ten produkt kupili także

$4.99

KSAX4700 JVC
Instrukcja Obsługi

Kompletna instrukcja obsługi w formie pliku PDF. Plik PDF zostanie dostarczony na Twój adres email…
>
Parse Time: 0.187 - Number of Queries: 104 - Query Time: 0.038